
Model Radio Workshop Gun Flasher With Sound MRW44MK4
Model Radio Workshop Gun Flasher With Sound MRW44MK4 will be backordered from our supplier. Delivery will take between 3-5 working days & orders will be despatched once completed.
Description
Description
Model Radio Workshop Gun Flasher With Sound
Features
Output can be sound, LED flash or both.
Firing speed is adjustable.
Can have repeating intermittent or continuous fire.
Burst fire parameters are adjustable.
Selectable operating switch direction.
Factory default reset option.
Instructions
The Machine Gun Unit can be made to realistically imitate Machine-gun fire. The default is for the output to fire continuously while the operating switch is held. If required, the unit can repeatedly fire in bursts of up to about eight seconds. The pause between the bursts is adjustable and can also be up to about eight seconds.
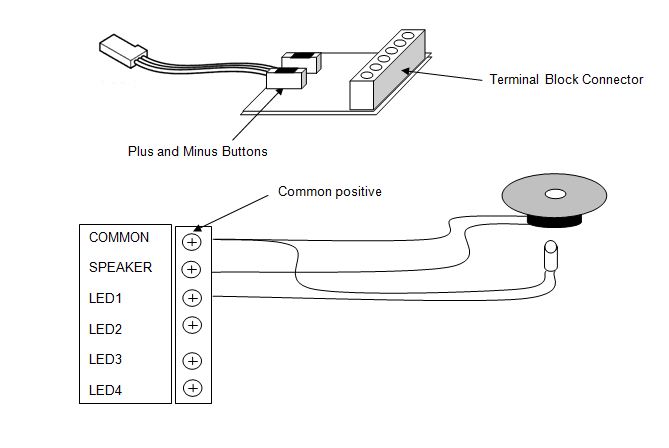
Connect the Machine Gun Unit to the selected channel on your receiver and wire the output to the diagram below paying particular attention to the battery polarity.
FIRE REPEAT SPEED
Press the “+” and “-” keys together while the unit is on until the set-up LED lights continuously to confirm that set-up is active. To increase the gun repetition speed, press and release the “+” key. The speed will change by one step with each press. Use the “-” key to decrease the repetition speed in the same way. Exit the set-up by pressing both keys together. The set-up LED will go out and the gun will fire at the new speed.
INTERMITTENT FIRE PAUSE TIME
Press hold and release the “-” key while the unit is on. The set-up LED will flash slowly to confirm that the pause time set-up is active. During set-up, the gun fires for a fixed period of about a second and then pauses according to the previous set-up. Press and release the “+” key to increase the pause time. The pause time will increase by one step with each press. Use the “-” key to reduce the pause time in the same way. Pause times up to about eight seconds can be set. Exit the set-up by pressing both keys together. The set-up LED will go out and the unit will operate with the new pause time.
INTERMITTENT FIRE BURST TIME
Press hold and release the “+” key while the unit is on. The set-up LED will flash rapidly to confirm that the burst time set-up is active. During set-up, the gun fires in bursts according to the previous set-up with a fixed pause of about a second. Press and release the “+” key to increase the burst time. The burst time will increase by one step with each press. Use the “-” key to reduce the burst time in the same way. Burst times of up to about eight seconds can be set. The time between bursts remains the same. Exit the set-up by pressing both keys together. The set-up LED will go out and the unit will operate with the new burst time.
TOGGLE SWITCH DIRECTION
Switch the transmitter on. Press and hold the “+” key and switch the unit on to toggle the operating switch direction between normal and reversed. The set-up LED will flash when the operation is complete and go out when the key is released. Hold the key until the LED flashes.
TOGGLE OUTPUT MODE
Switch the transmitter on. Press and hold the “-” key and switch the unit on to toggle the output between continuous and burst mode. The set-up LED will flash when the operation is complete and go out when the key is released. Hold the key until the LED flashes.
FACTORY RESET
Switch the transmitter on. Press both keys and switch the unit on. The set-up LED will flash when the reset is complete and go out when the keys are released. Hold the keys until the LED flashes.
SAFETY
Please ensure that the set-up keys cannot be pressed accidentally while the unit is in use.
Wiring up
Plug the unit into a spare channel to operate the flasher unit, then wire your L.E.D’s to the terminal block. The common is positive, so all of your L.E.D’s positives must go to this point and the negative of the L.E.D’s can go to any of the assigned LED terminals
The loud speaker is not polarized so can be wired either way round, the diagram just shows 1 L.E.D wired up make is easy to understand. If you find an L.E.D doesn’t light then its probable wired up in reverse.
Model Radio Workshop Gun Flasher With Sound MRW44MK4
Payment & Security
Payment methods
Your payment information is processed securely. We do not store credit card details nor have access to your credit card information.